Heat exchanger
Author: Alex Valdes [2015], Cindy Chen [2016]
Stewards: Jian Gong, and Fengqi You
Introduction
Heat exchangers are necessary process units that are part of any detailed process flow diagram. Process streams commonly interact through heat exchangers in order to save money on heating and cooling utilities. Furthermore, the surface area of the heat exchanger is proportional to the amount of heat that can be transferred and is the most indicative cost component of a heat exchanger (Wilcox, 2009). Therefore, all of the commercial simulators include models for heaters, coolers, heat exchangers, fired heaters,and air coolers (Towler and Sinnott, 2013). Typically, the only inputs necessary for heat exchanger models to converge are properly specified inlet streams (flow rate, temperature, pressure, composition), the pressure drop of flow pathways, and the outlet temperatures or the duty.
Aspen HYSYS V8.0
Model simulators such as HYSYS are extremely useful for engineers to quickly estimate capital costs and utility requirements.
Model Equations
HYSYS uses the following equations for adiabatic steady state heat exchangers (Wilcox, 2009):
(heat transferred from process stream)
(heat transferred to utility stream)
(rate of heat transfer)
where: Q is the rate of heat exchange (e.g., in kJ/h), Ni is the flowrate of stream i (e.g, in kmol/h), Hi is the specific enthalpy of stream i (kJ/kmol), U is the overall heat transfer coefficient (kJ/m2.K), A is the heat exchange area (m2), F is the correction factor for the deviation from cocurrent or countercurrent flow, dTavg is the average temperature difference between the streams for true cocurrent or countercurrent flow.
Heuristics
Before performing simulation, it is important to have an idea of practical considerations and parameter values. A comprehensive list of Heuristics in Chemical Engineering (Walas, 1990) is found at http://people.clarkson.edu/~wwilcox/Design/heurist.pdf. For shell and tube heat exchangers:
- Tube side is for corrosive, fouling, scaling, and high pressure fluids.
- Shell side is for viscous and condensing fluids.
- Pressure drops are 1.5 psi for boiling and 3-9 psi for other services.
- Water inlet temperature is 90°F, maximum outlet 120°F.
More rules of thumb for various types of heat exchangers, as well as many other pieces of process equipment, are contained in the source above.
Types of Heat Transfer Operations in HYSYS
Although shell and tube heat exchangers are widely used in practice, and most commonly taught to engineers first learning heat transfer, HYSYS contains various heat transfer units:
Table 1: HYSYS Heat Transfer Simulation Operations
| Unit | Heat Exchange Between | Input(s) | Output(s) |
|---|---|---|---|
| Cooler | Hot process stream and utility (energy) | Flow rate, composition of inlet stream. For inlet and outlet stream TWO out of THREE: temperature, pressure, vapor phase fraction | Duty, Q |
| Heater | Cold process stream and utility (energy) | Same as cooler | Duty, Q |
| Heat Exchanger | Two process streams, shell and tube geometry | Same as cooler for first process stream. For second process stream: composition, and TWO out of THREE: temperature, pressure, vapor phase fraction for inlet and outlet | Second process stream flow rate; Duty, Q; Heat Transfer Coefficient, U |
| LNG Exchanger | Multiple process streams, plate or plate-fin geometry | Same as shell and tube Heat Exchanger | Same as shell and tube Heat Exchanger |
| Air Cooler | Process stream and ideal air mixture | Same as cooler for process stream. | Total air flow; Fan rating; Heat transfer coefficient, U |
| Fired Heater (Furnace) | Combustion fuel gas and process stream(s) | Same as cooler for process stream. Air/fuel ratio | Flow rate of fuel/air; Duty, Q; Heat transfer coefficient, U |
Tutorial for Heat Exchanger
Input Properties
- Open Aspen HYSYS and create a New Case under File menu.
- Create a component list by adding all components present in the process.
- Select a thermodynamic fluid package that is applicable to the process see Property Package wiki article for more details on options or go to http://people.clarkson.edu/~wwilcox/Design/thermodl.htm
Enter Simulation
- In the model palette, there are a few options for heating/cooling units. Use a Heater or a Cooler to change the temperature of one process stream using a utility. Use a Heat Exchanger for two process streams exchanging heat, thereby changing the temperature of each. The following steps are for a Heat Exchanger, but the steps are similar for a Heater or Cooler.
- Click on the exchanger in the Flowsheet window. In the Design Tab under Connections, create Tube and Shell Side Inlet and Outlet streams (four streams). Choosing which fluid goes tube side and which goes shell depends on many factors, but some rules of thumb include putting high pressure and/or corrosive fluids tube side (Sloley, 2013).
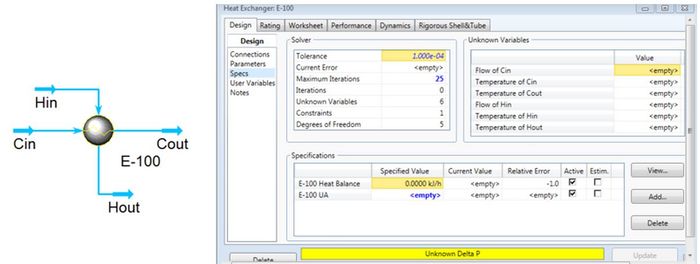
- To get a feel for how HYSYS interprets the situation, open the Specs section still in the Design Tab (image to the right). It can be seen that HYSYS needs five pieces of information (Degrees of Freedom =5) about the inlet and outlet streams. If the process is overspecified, HYSYS should give a message indicating the type of error, or may simply say no solution. After understanding the information in this table, enter four inlet parameters and one outlet parameter (the temperature of one of the outlets).
- At this point, HYSYS should say that there is an unknown Delta P. Specify (guess) the inlet and outlet pressures, the exchanger should then converge. Good initial guesses for pressure drop are between 0.3-0.7 bar or 30-70 kPa (Towler and Sinnott, 2013)
Figure 1. Heat Exchanger in Flowsheet and Design Specs Page
Customizing Heat Exchanger
- Once the exchanger has converged and the desired outlet temperature of one of the process streams has been achieved, various parameters can modified and more detailed analyses on the exchanger can be looked at.
- Under the Design Tab, under Parameters, choose one of the five potential heat exchanger models (most common choice is rigorous shell and tube).
Troubleshooting note: sometimes the rigorous heat exchanger model won't converge at first, even if the system is properly specified. Sometimes when this happens, switching to Simple End Point model and then switching back to the rigorous model will make it converge.
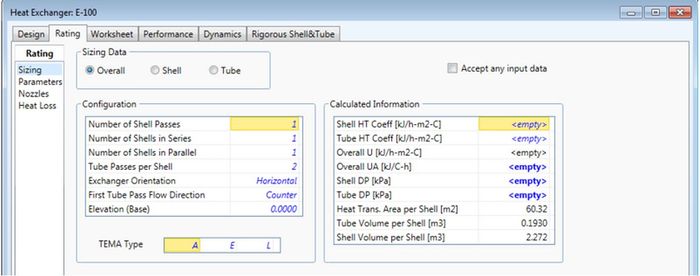
- At this point, utilize a neat feature of HYSYS in the Rigorous Model Section of the Parameters page: Size Rigorous Shell&Tube. Clicking on this will have HYSYS automatically run cases to determine optimal parameters of pressure drop and heat exchanger area (there is also an option to automatically run this feature). Once this feature converges, very useful information about the required overall heat transfer coefficient, pressure drop, heat transfer area, and other physical parameters is readily viewable under the Rating Tab.
- Also under the Rating tab, physical features of the heat exchanger such as the number of shell/tube passes can be modified (real heat exchangers typically have more than one or two tube passes per shell). These features of course change the necessary heat transfer coefficient (favorably), pressure drop (unfavorably), and unspecified outlet stream conditions.
Figure 2: Rating Tab containing physical/geometric parameters of exchanger
Common Issues
There a few common problems that arise when using heat exchangers in these programs.
When heat exchangers are used with streams that go to earlier stages of the process, an information loop occurs and the program is less likely to converge. Many times the process design requires a later process stream, such as the bottoms of a distillation column, to heat an earlier stream, such as the feed to the same column (Towler and Sinnott, 2012).
Another problem arises if the specifications of the heat exchanger are impossible, but the model still converges with physically unreasonable results - such as a temperature cross.
To avoid these problems, it is good practice to use utility heaters and coolers instead of heat exchangers to get an idea of the required heat load and parameters of an exchanger. The heaters and coolers are also useful for obtaining initial guesses of outlet temperatures and pressure drops. After that information is obtained, the designer will have a much better chance of simulating a heat exchanger that will converge with meaningful results (Wilxcox, 2009).
Heat Exchanger Networks
A typical plant requires the use of many individual heat exchanger units. This combined process heating and cooling of a plant could be accomplished through the use of utilities, but this will be very costly in term of capital and utility costs. Heat exchanger networks utilize multiple heat exchanger units to optimize the process design. Effective incorporation of heat exchanger networks will minimize the use of utilities, minimize the number of heat exchangers, and minimize costs associated with the design.
Model Equations and Heuristics
Heat exchanger networks are designed through insightful use of pinch analysis. The pinch point divides the temperature range into two regions. Pinch point analysis is a tabular procedure that is a convenient alternative to the construction and analysis of hot and cold composite curves. The temperature at which the temperature difference between the hot and cold stream is the smallest is the pinch point temperature. Determining the smallest Δ can be useful in calculating the optimal size of the heat exchanger (Marechal, 2005). The four steps of pinch point analysis are:
- 1. Divide the temperature range into intervals and shift the cold temperature scale.
- 2. Make a heat balance in each interval.
- 3. Cascade the heat surplus and deficit through the intervals.
- 4. Add heat so that no deficit is cascaded by adding the magnitude of the largest heat deficit from step 3 to each heat surplus and deficit. The position with a sum of 0 is the pinch position. The minimum heating and cooling utilities can also be determined in this step (Bagajewicz, 2008).
Detailed calculations and examples on obtaining the pinch point can be found on the pinch analysis page.
A valid heat exchanger network system must follow appropriate heuristics. Heating utility can only be used above the pinch, while cooling utility can only be used below it. Additionally, heat from a hot stream with temperature above the pinch must not be transferred to a cold stream with temperature below the pinch (Towler and Sinnot, 2012).
Minimum Energy Recovery Targets
The primary objective of building heat exchanger networks is to maximize the energy recovery from the hot process streams to the cold process streams. Thus, before starting the synthesis of a heat exchanger network, minimum energy recovery (MER) targets must be determined. There are three methods to doing so:
- 1. the temperature-interval method,
- 2. a graphical method using composite heating and cooling curves, and
- 3. linear programming (Seider, 2004).
The temperature-interval and composite curve methods have been outlined in pinch analysis page. A linear programming example is discussed below.
Linear Programming
Consider a system where two cold streams, C1 and C2, are to be heated and two hot streams, H1 and H2, are to be cooled without phase change. The conditions and properties of these streams are listed below.
Preliminary pinch analysis calculations lead to the following enthalphy changes in each interval.
The linear program can be formulated as:
- Minimize
- with respect to (w.r.t.):
- Subject to (s.t.):
The variables in this linear program are defined as follows:
- is the heat entering from a hot utility
- is the residual from interval i
- is the cold utility duty
where all energy requirements should be multiplied by 10,000 Btu/hr.
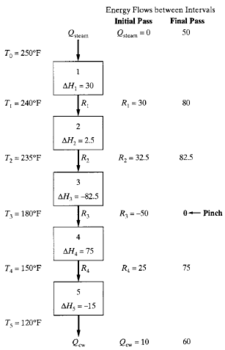
This program will minimize the heat entering from a hot utility. Figure 3 shows the energy flows between each interval of the system and the values of the variables calculated in the initial and final pass.
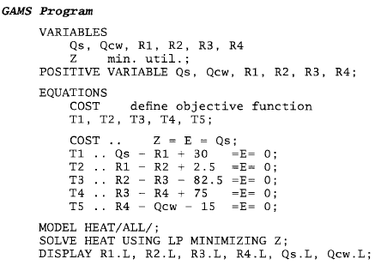
This linear program set up could be solved using the General Algebraic Modeling System (GAMS), as shown below.
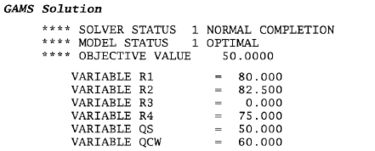
The GAMS Program first names the variables used in the program, stating the Z is the objective variable that will be minimized and the other variables are "positive variables," satisfying the final condition stated in Equation LP.6 that all utilities and residual values must be greater than zero. The linear program model is named HEAT and is solved using LP (signifying linear program algorithms) to minimize the Z variable.
From this result, , signifying that the pinch is located at interval 3, as seen in Figure 3. Additionally, this result reveals that the hot utility requirement, , is 500,000 Btu/hr and the cold utility requirement, , is 600,000 Btu/hr. However, this simulation only accounts for sensible heat changes. Additional variables, such as heat of reaction, heat of mixing, and even variable specific heat over time, should be considered in a more representative model.
This example is taken from Process Design Pinciples: Synthesis, Analysis, and Evaluation by Seider, Seader, and Lewin.
Tutorial for Heat Exchanger Network
Heat exchanger networks can be modeled using Aspen Energy Analyzer. Below is a tutorial provided by Aspen Technology (Aspen, 2011).
Input Properties
- Open Aspen Energy Analyzer
- Verify the units for your simulation through Tools >> Preferences >> Variables tab >> Units page
- Create a heat integration (HI) case under Features menu
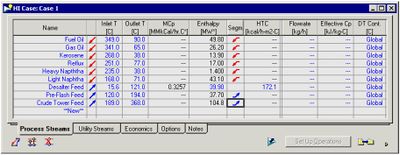
- Enter process stream data in pop-up window (as shown below)
- Once the inlet and outlet temperatures are entered, Aspen will determine the stream type as hot or cold.
- Input the enthalpy or flow heat capacity information for each stream. Stream segmentation is useful for streams that change phase or have non-linear variations in enthalpy as the temperature changes. After entering the information for the final segment, the process stream is complete and the window would appear as shown below.
- Enter stream name, first inlet temperature value and target outlet temperautre value. Only the outlet temperature values and heat load/enthalpy values need to be added, as the simulation calculated the inlet temperature values. The process streams tab will appear as shown below once complete. The red arrows represent hot streams that need to be cooled and the blue arrows represent cold streams that need to be heated.
- Enter utility stream data in the utility streams tab. In the Name column, scroll through to find the utilities needed for the simulation. Examples include: cooling water, LP steam generation, air, fired heat, etc. Aspen will report the default costs associated with each utility, which will be used to calculate operating costs for the system.
Enter Simulation
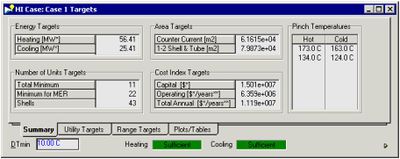
- Examine the targets of the case. From HI Case view, select the Open Targets View icon that appears at the bottom of the view for all tabs. This window will display the energy targets, pinch temperatures, minimum number of units required to build the network, and preliminary cost analysis.
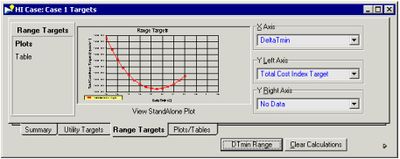
- Calculate the DTmin of the simulation. In the Targets window: Range Targets tab >> Calculate button >> Plots page. If a better approximation for optimal DTmin value is needed, click the Clear Calculations button to clear the plot before adjusting the DTmin range. To adjust the range, click the DTmin Range button located next to the Calculate button. A optimized DTmin range would resemble the figure shown below.
Modify Heat Exchanger Network Diagrams
- The heat exchanger network design can be viewed by clicking the Open HEN Grid Diagram icon in the HI Case view.
- Heat exchanger networks may include splitters, heat exchangers, and coolers.
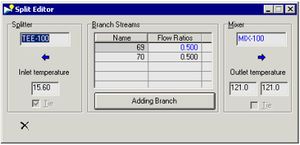
- Add a splitter to the network: open palette view located in the bottom right corner of the Grid Diagram tab. Right click and hold the Add Split icon. Drag the cursor over the stream to be split until a bulls eye icon appears. Once the mouse is released, a solid blue dot will appear on the stream to represent the splitter. Click the blue dot once to expand the slitter.
- Add a heat exchanger: right click and hold the Add Heat Exchanger icon from the Design Tools palette. Once the mouse is released, a solid red dot will appear on the desired stream. Click and hold the red dot to the new stream. The heat exchanger will appear once the mouse is released. Double click either end of the heat exchanger to open the Heat Exchanger Editor view. On the Data tab, click the Tied checkbox by the appropriate streams and enter other temperatures as needed.
- Adjust the split ratio: open HEN Diagram Properties View and click the New button. Input Split Ratio into the Name field. Select Edit >> Annotations tab >> Streams group >> Segments drop-down list >> Split Fraction. Double-click on either end of the heat exchanger to observe the changes in the hot stream inlet temperature. Double-click on either end of the splitter to open the splitter view. Adjust the split ratio accordingly.
Once the heat exchanger network is complete, the status bar on the Grid Diagram tab will appear green.
Future Developments
While heat exchanger networks try to optimize the energy costs for heating and cooling utility, capital costs are often difficult to calculate and incorporate in the analysis. Around the pinch point, the hot and cold streams are most constrained. This leads to the requirement of large heat exchangers to effectively transfer heat between hot and cold streams. A design for maximum heat recovery and minimum number of exchangers will typically include a loop in the network.
As seen in the figure above, a loop may cross the pinch point. These loops can be broken by transferring heat across the pinch point. This, however, violates the heuristic that heat should not be transferred across the pinch point and at least one violation of the specific Δ will also occur. To restore Δ, heat can be shifted along a path, which increases the energy consumption of the process. From this dilemma, it is clear that there are pros and cons to the attempt to minimize any heat exchanger network.
Analysis with the incorporation of capital costs can be done by assessing the heat exchanger network as a mixed integer non-linear programming (MINLP) problem. MINLP problems are typically solved using numerical solvers. But large scale MINLP problems, such as the ones that may be generated for a process plant, may be difficult to solve using available numerical algorithms and solvers (Biegler, 1999).
References
- G.P. Towler, R. Sinnott. Chemical Engineering Design: Principles, Practice and Economics of Plant and Process Design. Elsevier, 2012.
- Sloley. "Shell-and-Tube Heat Exchanger: Pick the Right Side". Chemical Processing. October, 2013
- Wilcox. "Sizing of heat exchangers using HYSYS or UniSim". 2009. http://people.clarkson.edu/~wwilcox/Design/hxsizing.htm date accessed: March 1, 2015
- S.M. Walas. (1990). Chemical Process Equipment - Selection and Design. Elsevier
- W.D. Seider, J.D. Seader, D.R. Lewin, Process Design Principles: Synthesis, Analysis, and Evaluation, Wiley: New York, 2004.
- Aspen Technology, Inc. Aspen Energy Analyzer: Tutorial Guide. (2011)
- M.J. Bagajewicz. Heat Integration Chemical Engineering PanAmerican Collaboration. 2008.
- F. Maréchal, D. Favrat. Combined Exergy and Pinch Analysis for Optimal Energy Conversion Technologies Integration. 2005.
- L.T. Biegler, I.E. Grossmann, A.W. Westerberg. Systematic Methods of Chemical Process Design, Prentice Hall: New Jersey, 1999.


